Blackview BV4800 MT6761V
2024/02/29
For Rooting a mediatek device we need some tools
-
MTKclient : MTKclient on GitHub
-
Magisk : Magisk on GitHub
MTK client Installation
For ArchLinux
(sudo) pacman -S python python-pip git libusbyay -S python python-pip git libusbGrab files and install
git clone https://github.com/bkerler/mtkclient
cd mtkclient
Create a python environment and got into it
python3.8 -m venv env
source env/bin/activate
Install requirements
pip install -r requirements.txtStart gui interface
python mtk_guiconnect your phone following the steps given in mtk client gui
when device is connected we can't quit and use command line or stay in gui
Use MTK client with command line to get file boot and vbmeta
download boot.img and vbmeta.img
python mtk r boot_a,vbmeta_a boot.img,vbmeta.imgFor another device, the file to be patch is "boot", "recovery.img" or "init_boot.img".
Unlock bootloader
python mtk da seccfg unlockInstall Magisk and patch the boot.img
Install Magisk-v26.1.apk to the smartphone storage using adb. Github Magisk Release
adb install Magisk-v26.1.apk Attention only version 26.1 of Magisk works, higher versions are not functional for this phone
Copy the file boot.img to the smartphone storage using the adb push command.
adb push boot.img /sdcard/DownloadLaunch the Magisk app on the phone and select Magisk ⇒ Install ⇒ Select and Patch a File: point the program to the boot.img file that you uploaded into the phone storage. After a little of work you should obtain a modified boot image saved into a file like /sdcard/Download/magisk_patched-26100_xxxxx.img. The image should contain a modified ramdisk, which will provide the su command (superuser) when the Android system is running, but actually without modifying the system partition.
Download the patched boot.img to your PC using the adb pull command.
adb pull /sdcard/Download/magisk_patched-26100_xxxxx.img ./Sign the patched boot.img and vbmeta.img
Thanks to Niccolo Rigacci
Sign the patched boot.img
The Blackview BV4800 is based on Android 13 and the Android Verified Boot process cannot be disabled. So the patched boot.img must be signed with an RSA public/private key and the public part must be included into the vbmeta.img partition.
You need the avbtool.py tool (it is a Python 3 script, so you must have Python 3 installed); with that script you can get some info from the original boot.img:
python avbtool.py info_image --image 'boot.img'
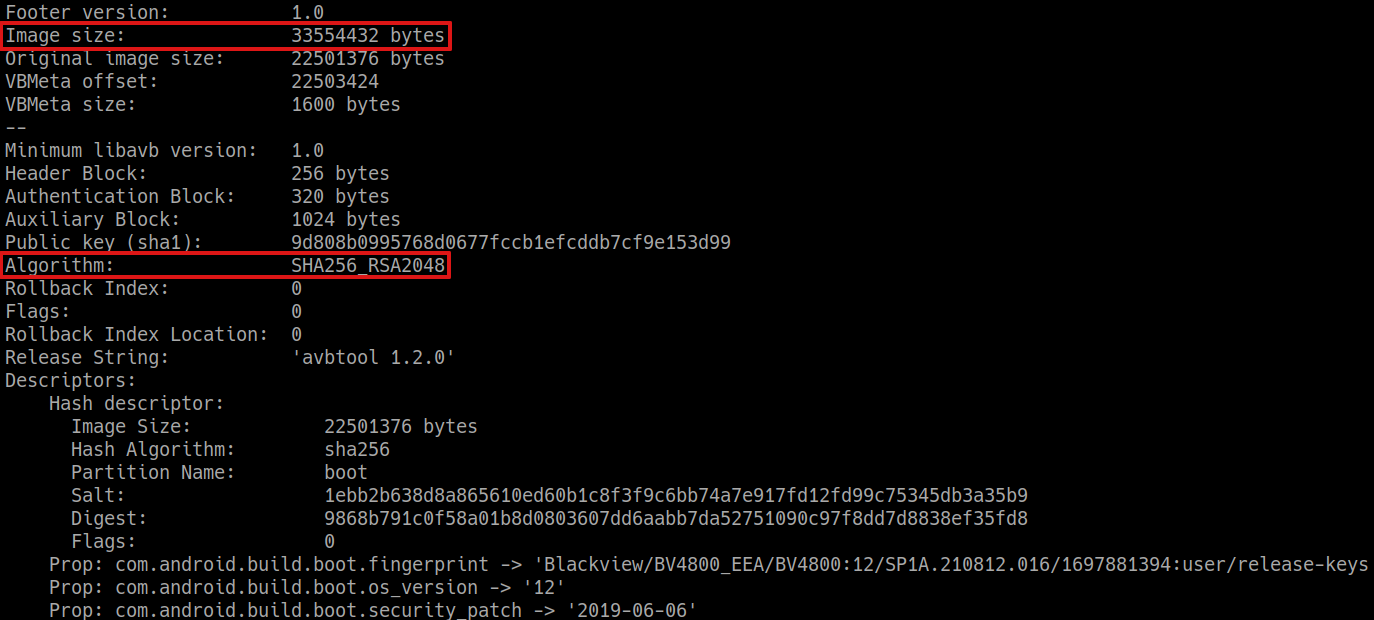
The output will reveal the partition image size (33554432 bytes, which is exactly the size of the file) and that the public key algorithm is SHA256_RSA2048.
Then you need a 2048 bit RSA key; you can create your own, but it is common practice to use the one included into the Android SDK. Download the RSA key named testkey_rsa2048.pem.
you can Download it from android.googlesource.com
testkey_rsa2048.pem
With all this information, you can sign the file (actually add an hash footer inside the file). Beware that the file will be patched in-place, so make a backup copy before running the command:
cp 'magisk_patched-26100_xxxxx.img' 'magisk_patched-26100_xxxxx-signed.img'

python avbtool.py add_hash_footer \
    --image 'magisk_patched-26100_xxxxx-signed.img' \
    --partition_name 'boot' --partition_size '33554432' \
    --key 'testkey_rsa2048.pem' --algorithm 'SHA256_RSA2048'
Create and sign a custom vbmeta.img
Since Android Verified Boot in this device cannot be disabled, we need a properly crafted and signed vbmeta.img partition. Essentially the vbmeta partitions contains:
-
An header with the overall signing hash.
-
A list of partition names to be verified by the bootloader. Along with each name there is the public key to be used for the verification (where the private part was used for signing that partition).
-
The public key whose private part was used for signing the whole vbmeta partition.
For the overall signing of the vbmeta partition we will use the same testkey_rsa2048 used to sign the boot partition; we need to extract the public part from it (all the keys to be used will be saved into a keys subdirectory):
python avbtool.py extract_public_key \
    --key 'testkey_rsa2048.pem' \
    --output 'keys/testkey_rsa2048_pub.bin'
NOTICE: All the public keys used here are saved into the AvbRSAPublicKeyHeader format, not the default PEM or DER formats used by openssl. This is a specific format for the Android Verified Boot process.
From vbmeta.img we need to extract all the public keys of the partitions that were not altered (i.e. all the partitions listed in it, except the boot one). Browsing the vbmeta.img file with an hex editor it is easy to spot each entry of the list; it is composed as follows:
-
An empty space made up of 64 zero bytes.
-
The name of the partition, e.g. vbmeta_system.
-
A token of four bytes: 0x00 0x00 0x08 0x00 (this should be the default token for a 2048 bit key).
-
The actual key in AvbRSAPublicKeyHeader format. A 2048 bit keys results into a 516 bytes chunk.
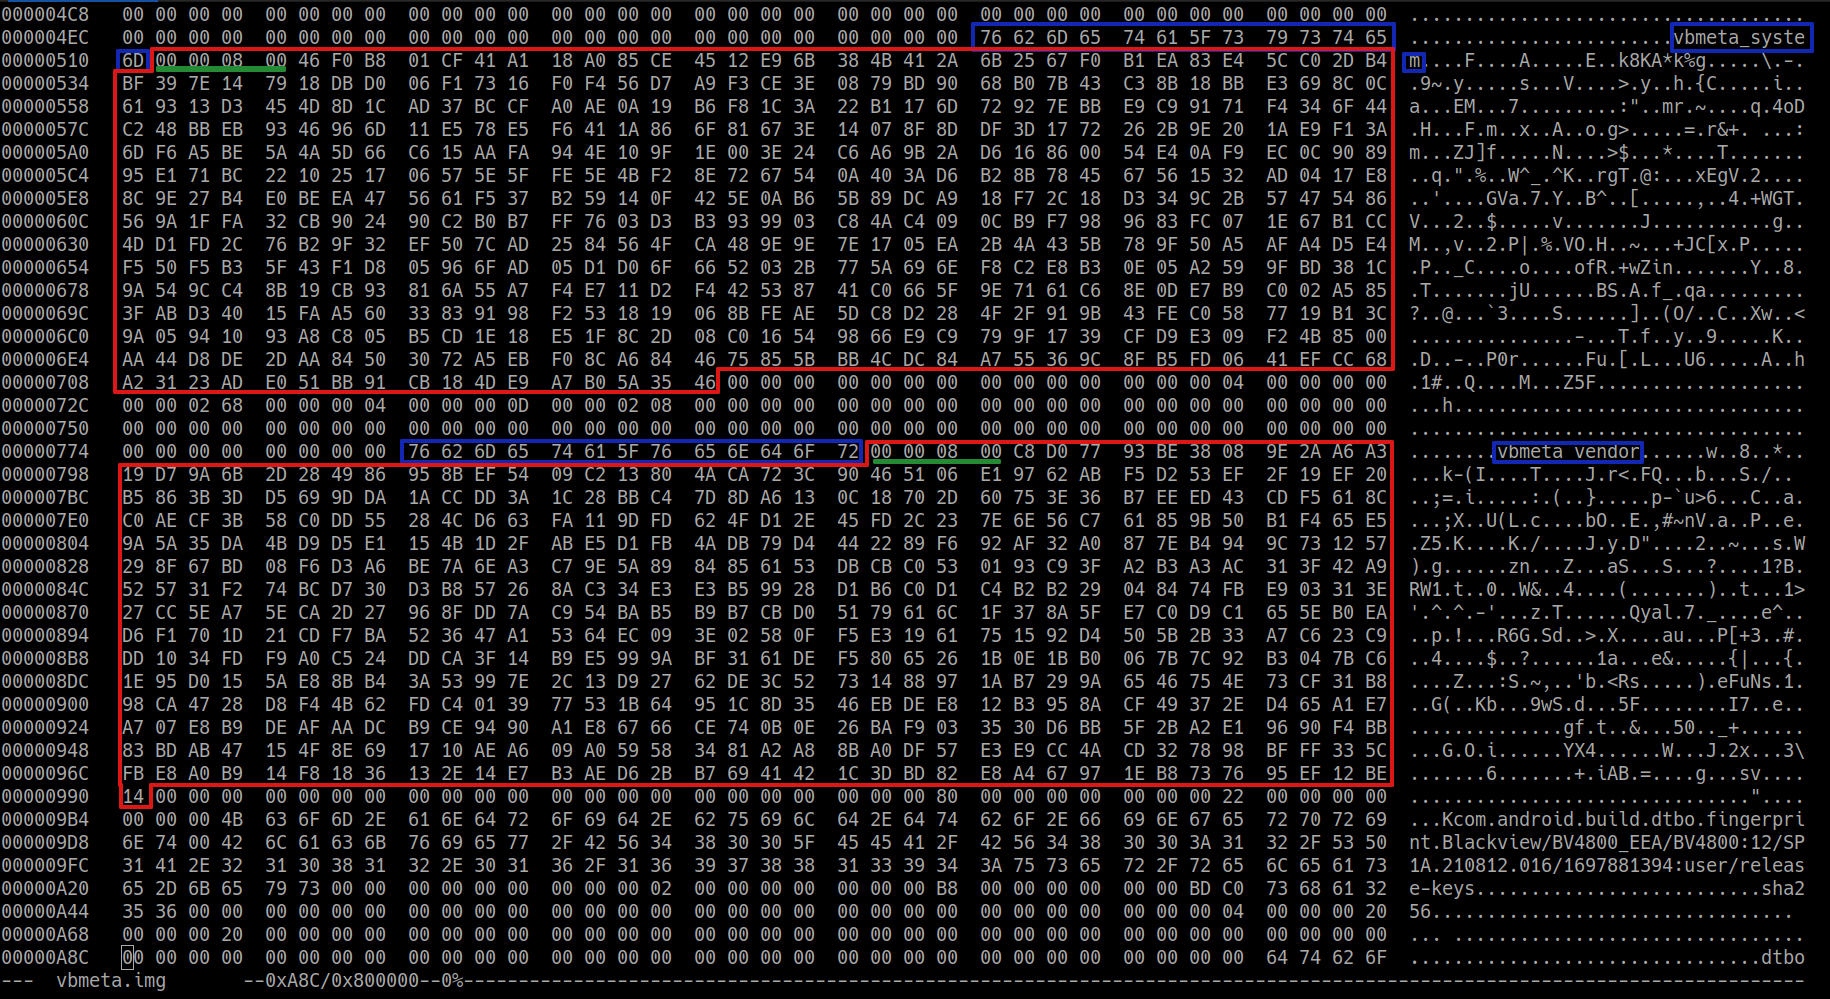
The vbmeta partition of the Blackview BV4800 contains the signing information about the following partitions:
- boot
-
vbmeta_system
-
vbmeta_vendor
With an hex editor we need to extrac only the keys for vbmeta_system and vbmeta_vendor including the initial 4 bytes token, thus creating two files of 520 bytes each. That key files will be used to create the signed custom vbmeta image, in fact the vbmeta_system and vbmeta_vendor images are unaltered, so we re-use the same public keys. I used the Linux program hexedit: with F9 and the arrows it is possibile to select a bytes region, F7 to copy and Ctrl-Y (or ESC+Y for Linux) to save the copied region into a new file.
result files must be 520 :
-rw-r--r-- 1 user user 520 key_vbmeta_system.bin
-rw-r--r-- 1 user user 520 key_vbmeta_vendor.bin
-rw-r--r-- 1 user user 520 testkey_rsa2048_pub.bin
So we have three key files: keys/key_vbmeta_system.bin and keys/key_vbmeta_vendor.bin extracted from the original vbmeta image and keys/testkey_rsa2048_pub.bin that we will use to sign the custom boot image.
For the final recipe we need some other piece of information; launch avbtool.py to get info_image from the original vbmeta.img:
python avbtool.py info_image --image 'vbmeta.img'

What we need is the Flags value and the Rollback Index Location for each of the listed partitions. With that information we can compose the final command to create the custom and signed vbmeta partition:
python avbtool.py make_vbmeta_image \
    --key 'testkey_rsa2048.pem' --algorithm 'SHA256_RSA2048' --flag 0 \
    --chain_partition 'vbmeta_system:2:keys/key_vbmeta_system.bin' \
    --chain_partition 'vbmeta_vendor:4:keys/key_vbmeta_vendor.bin' \
    --chain_partition 'boot:3:keys/testkey_rsa2048_pub.bin' \
    --padding_size '48576' --output 'vbmeta-custom-sign.img'
You should be able to understand each parameter: the flag (zero in our case), each partition name is followed by its Rollback Index Location and the name of the file containing the public key used to sign it, the padding size is the overall size of the vbmeta.img file.
We used the same Rollback Index Location used in the original vbmeta image. In teory an unlocked bootloader should accept any rollback index, while a locked bootloader will refuse to boot from lower indexes to prevent the downgrade of the firmware.
Use MTK client with command line to push file patched_Signed_boot and signed_vbmeta
python mtk w boot_a,vbmeta_a magisk_patched-26100_biB8t-signed.img,vbmeta-custom-sign.imgOnce installation is complete, we can restart the device.
python mtk resetOpen magisk
See if you can open superuser, if so, you're root!

Web References
Rooting blackview bv5300 by Niccolo Rigacci
No comments to display
No comments to display