connect your phone following the steps given in mtk client gui
when device is connected we can't quit and use command line or stay in gui ##### ### Use MTK client with command line to get file boot and vbmeta download boot.img and vbmeta.img ``` python mtk r boot_a,vbmeta_a boot.img,vbmeta.img ```For another device, the file to be patch is "boot", "recovery.img" or "init\_boot.img".
### Unlock bootloader ```bash python mtk da seccfg unlock ``` ### Install Magisk and patch the boot.img Install **Magisk-v26.1.apk** to the smartphone storage using **adb. [Github Magisk Release](https://github.com/topjohnwu/Magisk/releases "Github Magisk Release")** ``` adb install Magisk-v26.1.apk ```Attention only version 26.1 of Magisk works, higher versions are not functional for this phone
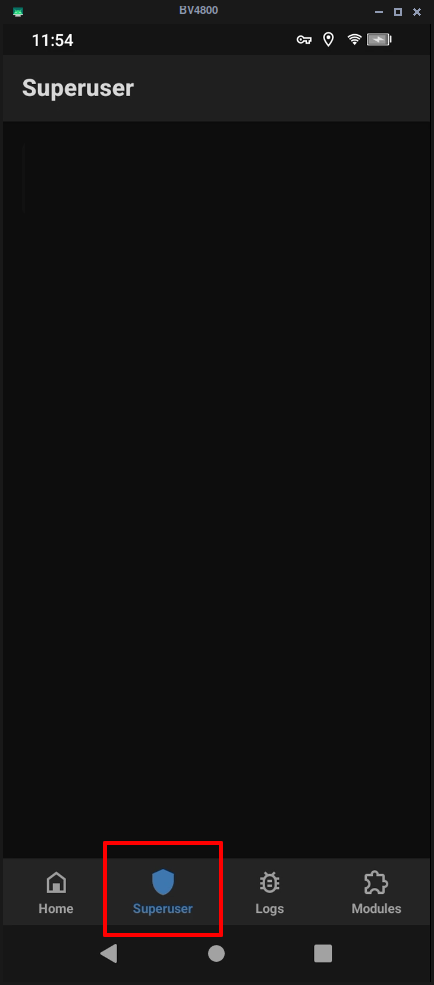
Copy the file **boot.img** to the smartphone storage using the **adb push** command. ``` adb push boot.img /sdcard/Download ``` Launch the Magisk app on the phone and select *Magisk* ⇒ *Install* ⇒ **Select and Patch a File**: point the program to the **boot.img** file that you uploaded into the phone storage. After a little of work you should obtain a modified boot image saved into a file like `/sdcard/Download/magisk_patched-26100_xxxxx.img`. The image should contain a modified ramdisk, which will provide the **su** command (superuser) when the Android system is running, but actually without modifying the **system** partition. Download the patched boot.img to your PC using the **adb pull** command. ``` adb pull /sdcard/Download/magisk_patched-26100_xxxxx.img ./ ``` ### Sign the patched boot.img and vbmeta.img Thanks to [Niccolo Rigacci ](https://www.rigacci.org/ "Niccolo Rigacci ") #### Sign the patched boot.img The Blackview BV4800 is based on Android 13 and the [Android Verified Boot](https://android.googlesource.com/platform/external/avb/+/master/README.md "https://android.googlesource.com/platform/external/avb/+/master/README.md") process cannot be disabled. So the patched **boot.img** must be signed with an **RSA public/private key** and the public part must be included into the **vbmeta.img** partition. You need the **avbtool.py** tool (it is a Python 3 script, so you must have Python 3 installed); with that script you can get some info from the original boot.img: ``` python avbtool.py info_image --image 'boot.img' ``` [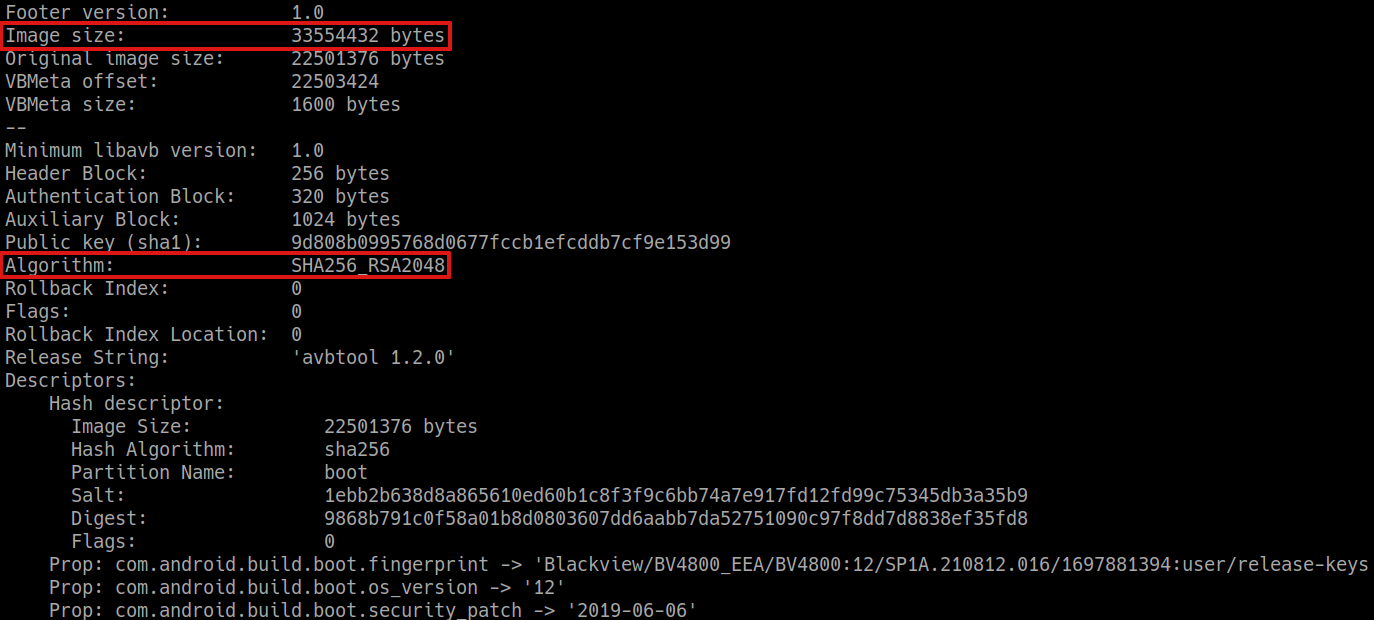](https://wiki.mira-ceti.ovh/uploads/images/gallery/2024-02/vZnCli3XGIeIyuka-image.png) The output will reveal the **partition image size** (33554432 bytes, which is exactly the size of the file) and that the public key **algorithm** is *SHA256\_RSA2048*. Then you need a 2048 bit RSA key; you can create your own, but it is common practice to use the one included into the Android SDK. Download the RSA key named **testkey\_rsa2048.pem**. you can Download it from android.googlesource.com [testkey\_rsa2048.pem](https://android.googlesource.com/platform/system/bvb/+/40fb5f401adf6745f359f4be1b1f4287261690ad/test/testkey_rsa2048.pem "Android.googleSource") With all this information, you can sign the file (actually add an hash footer inside the file). Beware that the file will be patched in-place, so make a backup copy before running the command: ``` cp 'magisk_patched-26100_xxxxx.img' 'magisk_patched-26100_xxxxx-signed.img' python avbtool.py add_hash_footer \ --image 'magisk_patched-26100_xxxxx-signed.img' \ --partition_name 'boot' --partition_size '33554432' \ --key 'testkey_rsa2048.pem' --algorithm 'SHA256_RSA2048' ``` #### #### Create and sign a custom vbmeta.img Since Android Verified Boot in this device cannot be disabled, we need a properly crafted and signed **vbmeta.img** partition. Essentially the vbmeta partitions contains:See if you can open superuser, if so, you're root!
[](https://wiki.mira-ceti.ovh/uploads/images/gallery/2024-02/HeJ61gA88lYha6wg-image.png) ## Web References [MTKclient on GitHub](https://github.com/bkerler/mtkclient "MTKclient") [Magisk on GitHub](https://github.com/topjohnwu/Magisk "Magisk") [avbroot on Github ](https://github.com/chenxiaolong/avbroot "avbroot") [Rooting blackview bv5300 by Niccolo Rigacci](https://www.rigacci.org/wiki/doku.php/doc/appunti/hardware/blackview_bv5300 "rigacci.org") # Fast rooting BV4800 with file ### Unlocking OEM ##### Enable dev options ##### check OEM option ##### and enable adb ### Install Magisk and patch the boot.img Install **Magisk-v26.1.apk** to the smartphone storage using **adb. [Github Magisk Release](https://github.com/topjohnwu/Magisk/releases "Github Magisk Release")** ```bash cd ~/rooting_tablette/apk adb install Magisk-v26.1.apk ```Attention only version 26.1 of Magisk works, higher versions are not functional for this phone
##### Shutdown device ```bash adb reboot -p ``` Start MTK client ```bash cd ~/github/mtkclient/ source env/bin/activate ``` ##### Start gui interface ```bash python mtk_gui ```connect your phone following the steps given in mtk client gui
This step is only to learn how to put the device in BROM mode, otherwise you can run an MTK command and it will run until it detects a phone.
when device is connected we can't quit and use command line ### Unlock bootloader ```bash python mtk da seccfg unlock ``` ### Use MTK client with command line to push file patched\_Signed\_boot and signed\_vbmeta BOOT NORMAL ```bash python mtk w boot_a,vbmeta_a,lk_a bv4800_image/magisk_patched-26100_biB8t-signed.img,bv4800_image/vbmeta-custom-sign.img,bv4800_image/lk_patched.bin ``` BOOT AVEC NFC ```bash python mtk w boot_a,vbmeta_a,lk_a bv4800_NFC_image/magisk_patched-26100_KhTyb.img,bv4800_image/vbmeta-custom-sign.img,bv4800_image/lk_patched.bin ``` Once installation is complete, we can restart the device. ```bash python mtk reset ``` Open magisk and see if you can open superuser, if so, you're root! [](https://wiki.mira-ceti.ovh/uploads/images/gallery/2024-02/HeJ61gA88lYha6wg-image.png) ## Web References [MTKclient on GitHub](https://github.com/bkerler/mtkclient "MTKclient") [Magisk on GitHub](https://github.com/topjohnwu/Magisk "Magisk") [avbroot on Github ](https://github.com/chenxiaolong/avbroot "avbroot") [Rooting blackview bv5300 by Niccolo Rigacci](https://www.rigacci.org/wiki/doku.php/doc/appunti/hardware/blackview_bv5300 "rigacci.org") # ALLDOCUBE NFE T811MAN ### File [Firmware + bootloader](https://mega.nz/folder/XwMX3LzB#UuCzX7-F_6pucoxRVjLkkA/file/y90SzDJI "Firmware + bootloader") ### ### **Unlock Bootloader** 1. go in settings and urn on developer option 2. unlocking "oem" 3. activated adb ```bash adb reboot bootloader ``` ```bash fastboot flashing unlock ```on device press volume down (you have 3second)
```bash fastboot flashing unlock_critical ```on device press volume down (you have 3second)
### **Flash December Firmware** **Download the december firmware on :** [Alldocube Firmware](https://www.alldocube.com/en/firmware/alldocube-iplay50minipro-nfet811man-firmware-download/) unrar folder and go in. Install Firmware ```bash cd ~/rooting_tablette/Firmware/T811MAN_NFE_DECEMBER ``` ```bash fastboot flash super super.img ``` ```bash fastboot reboot ``` ### **Flash Bootloader and Firmware** ```bash adb reboot bootloader ``` install Bootloader ```bash cd ~/rooting_tablette/Firmware/T811MAN_NFE_ROOT ``` install Bootloader ```bash fastboot flash boot magisk_patched-27000_MR09X.img ``` unlock Bootloader verification ``` fastboot --disable-verity --disable-verification flash vbmeta_a vbmeta_a.original.img fastboot --disable-verity --disable-verification flash vbmeta_b vbmeta_a.original.img ``` install Firmware ```bash fastboot flash super superRW-WORK.img ``` Clear partition ``` fastboot reboot fastboot ``` ``` fastboot erase userdata && fastboot erase metadata && fastboot reboot ```on device when in reboot on fastbootd choose "Reboot to bootloader"
Force reboot at end
### **Finish installation** 1. go in settings and urn on developer option 2. unlocking "oem" 3. activated adb 4. install magisk and launch app ``` adb install Magisk-v27.0.apk ``` # ALLDOCUBE badgeuse ### File [Firmware + bootloader](https://mega.nz/folder/XwMX3LzB#UuCzX7-F_6pucoxRVjLkkA/file/y90SzDJI "Firmware + bootloader") ### ### **Unlock Bootloader** 1. go in settings and urn on developer option 2. unlocking "oem" 3. activated adb ```bash adb reboot bootloader ``` ```bash fastboot flashing unlock ```on device press volume down (you have 3second)
```bash fastboot flashing unlock_critical ```on device press volume down (you have 3second)
### **Flash Bootloader and Firmware** ```bash cd ~/rooting_tablette/Firmware/T811MAN ``` install Bootloader ```bash fastboot flash boot magisk_patched-27000_MR09X.img ``` unlock Bootloader verification ``` fastboot --disable-verity --disable-verification flash vbmeta_a vbmeta_a.original.img fastboot --disable-verity --disable-verification flash vbmeta_b vbmeta_a.original.img ``` install Firmware ```bash fastboot flash super superRW-WORK.img ``` Clear partition ``` fastboot reboot fastboot && fastboot erase userdata && fastboot erase metadata && fastboot reboot ```on device when in reboot on fastbootd choose "Reboot to bootloader"
Force reboot at end
### **Finish installation** 1. go in settings and urn on developer option 2. unlocking "oem" 3. activated adb 4. install magisk and launch app ``` adb install Magisk-v27.0.apk ```